

You can declutter and organize your home in a weekend, or a few focused weeks if you’d rather go slow. The method is simple: work one small zone at a time, sort everything into keep, donate, and toss, then give every keeper a permanent home. It’s a beginner-friendly job that needs very little gear, mostly boxes, bags, and a free afternoon.
Why does this work when so many cleanouts stall? Because the whole house is too big a target. A single drawer or one shelf is finished in twenty minutes, and that quick win builds the momentum you need for the next one. You stop deciding about “all your stuff” and start deciding about one coffee mug.
Most people feel stuck before they even begin, and that’s normal. Clutter piles up slowly, one “I’ll deal with it later” at a time. Professional organizers see the same pattern in nearly every home: the problem usually isn’t a lack of storage, it’s items without a clear place to live.
Below, you’ll find what to gather first, a few safety notes, a numbered step-by-step plan, room-by-room quick wins, and simple ways to check your results and keep them. We’d also love to hear what’s working for you, so share your own tips in the comments.
Before You Start: Set Your Goals and Pick Your Starting Point

Before you pull a single thing off a shelf, take a minute to picture what “decluttered” actually looks like in your home. For a family with three kids, it might mean a front hall where shoes have a spot and backpacks don’t pile up. For a couple in a small apartment, it could be a bedroom where the closet door closes without a fight. There’s no magazine-perfect standard to hit. Your definition is the only one that counts.
Try writing down one or two sentences about what “done” means. Something like, “I can find my keys in ten seconds,” or “Every kitchen drawer opens easily.” That small bit of clarity keeps you from wandering room to room and ending the day with a bigger mess than you started with.
Next, shrink the job. One drawer, one shelf, or one corner of the closet is plenty for your first session. Finishing something small gives you a quick win, and that little burst of satisfaction is what carries you into the next zone. Set a timer for 20 or 30 minutes, too. A time limit makes it easier to begin, and it gives you a natural place to stop.
As for where to begin, skip the spots that tug at your heart. Interior designers and professional organizers often point newcomers toward low-emotion areas like the bathroom or linen closet. As many organizers put it, nobody agonizes over an expired bottle of sunscreen or a towel with a frayed edge, so you build decision-making muscle without the guilt. By the time you reach the sentimental stuff, you’ll have a rhythm.
Once you’ve picked your zone and your finish line, you’re ready to gather supplies.
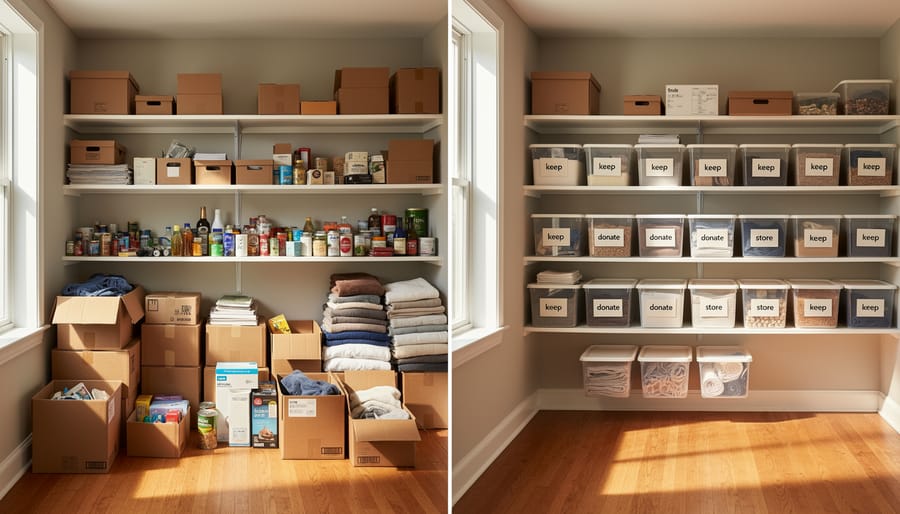
What You’ll Need: Tools and Materials for a Smooth Declutter
You don’t need a shopping trip to start decluttering. Most of what makes the process smooth is already sitting in your closet or garage, and gathering it first means you won’t wander off mid-task to hunt for a trash bag.
Here’s a simple starter kit:
- Sturdy boxes or bins for sorting your keep, donate, and relocate piles
- Trash bags for anything that’s truly done its time
- A marker and masking tape or sticky labels so nothing gets mixed up
- Cleaning cloths and an all-purpose spray for wiping down shelves as they empty
- A timer on your phone to keep sessions short and focused
- A dedicated donation bag or box you can fill and drop at the car
- A stable step stool for reaching high shelves safely
The timer deserves a special mention. Setting it for 20 or 30 minutes turns a vague, overwhelming chore into a game with a finish line. When it rings, you’re free to stop, though you’ll often find you want to keep going.
Now, a gentle word of caution about the fun stuff. Bins, drawer dividers, shelf risers, and label makers can make a space look wonderfully tidy, and they’re tempting to buy early. Resist that urge. Until you’ve sorted through your belongings, you simply don’t know how much you’re keeping, and storage bought in advance often turns out to be the wrong size or number. Plenty of people end up with a pile of containers that become clutter themselves.
Do the purge first. Then measure your shelves and drawers, count what’s left, and buy only the organizers that solve a real problem you’ve noticed. Your wallet and your home will both thank you.
Stay Safe While You Clear Things Out

Decluttering feels harmless, but it involves a lot of lifting, reaching, and digging through forgotten corners. A few simple habits keep you comfortable and injury-free.
When you lift a heavy box, bend your knees, keep your back straight, and hold the load close to your body. If a box is too heavy, split it into smaller loads or ask a friend to help. Reaching high shelves? Use a stable step stool or ladder, never a wobbly chair or a stack of books. Make sure the legs are on level ground before you climb.
Cleaning out an attic, garage, or basement is dustier than it looks, so put on work gloves and a dust mask before you start. Gloves also protect your hands from splinters, broken glass, and the sharp edges of old tools, craft blades, and kitchen knives. Wrap sharp items in cardboard or thick paper before tossing them, so no one gets hurt later.
Some things mean it’s time to pause. If you find mold, you’ll want to learn how to remove mold safely before touching anything else nearby, and larger patches may need a professional.
The same goes for batteries and old electronics, which usually need special drop-off rather than a spot in the trash. Check your city’s website for collection days and rules. It’s a quick step that keeps your family and your community safe.
The Step-by-Step Declutter and Organize Process
Sorting With Confidence: Keep, Donate, Toss, Relocate
Sorting is where most people stall, so give yourself a few quick questions to lean on. Ask, “Have I used this in the past year?” and “Would I buy this again today?” If the answer to both is no, it’s probably time to let it go. For duplicates, keep the best one and donate the rest.
Sentimental items need a gentler touch. Set up a single memory box, and once it’s full, that’s your limit. For bulky keepsakes, snap a photo before you part with them, since the memory lives on without the shelf space.
Guilt over gifts trips up almost everyone. One community member put it simply: “The gift did its job when someone thought of me. I don’t owe it a permanent spot on my shelf.”
Here’s a simple process you can repeat in any room:
- Pick one zone and set a timer for 30 to 45 minutes.
- Empty the space completely so you see everything you own there.
- Sort each item into keep, donate, toss, or relocate piles.
- Clean the empty surface. If it’s wood, you can clean with vinegar diluted properly, or follow these tips on safe wood cleaning to protect the finish.
- Group like items together, such as all batteries or all spare cables.
- Assign each keeper a home, placing the things you use most at easy-to-reach heights.
- Label shelves or bins and put everything back where it belongs.
- Remove donation and trash bags right away, before second thoughts creep in.
Don’t forget your relocate pile. Those items belong in other rooms, so deliver them straight away rather than letting them become a new mess.
Giving Everything a Home: Smart Storage Ideas
Once you’ve pared things down, the goal is simple: every item that stays gets one permanent home. When something has a clear spot, putting it away takes seconds, and that’s what keeps clutter from creeping back.
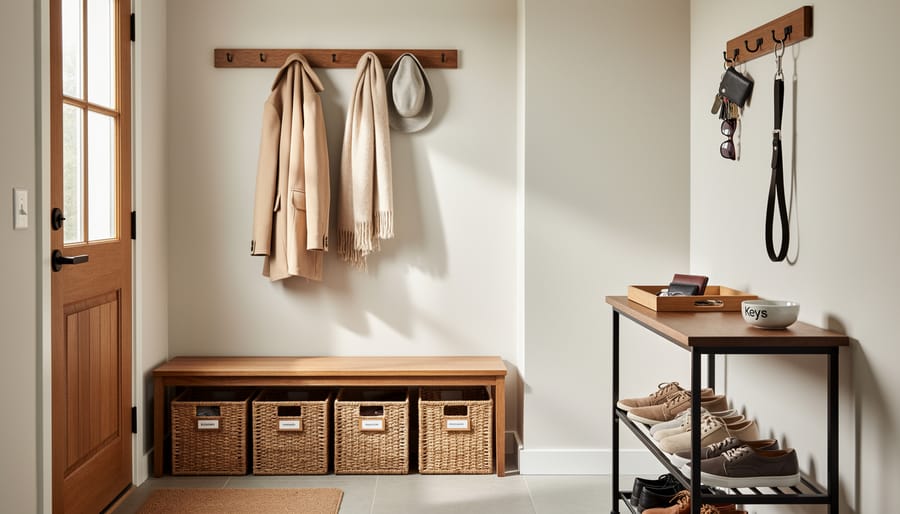
Start with the “store it where you use it” rule. Keep scissors and tape in the desk drawer, not a hallway closet. Park the dog leash by the door and the spare phone charger near the couch. If you have to walk across the house to put something away, it will end up on the counter instead.
Next, look up. Walls are the most underused storage in most homes. Tall bookcases, wall-mounted shelves, and over-the-door hooks free up floor space and make a room feel bigger. Put the things you grab daily at eye level and between waist and shoulder height. Save high shelves for seasonal items and low spots for heavier things like board games or backup supplies.
Furniture can do double duty too, and this is where good interior design pays off. Consider:
– A storage ottoman that holds throw blankets and doubles as a footrest
– An entryway bench with cubbies or baskets for shoes and bags
– A bed with built-in drawers, ideal for off-season clothes or extra bedding
– A coffee table with a lower shelf or lift-top for remotes, magazines, and chargers
Before buying anything, measure your space and match the storage to what you actually own. Furniture that hides clutter only helps if you’ve already done the sorting.
What’s the one piece of storage furniture you couldn’t live without? Share it in the comments!
Room-by-Room Quick Wins
Some rooms collect clutter faster than others, so start where the mess bothers you most. Each of these wins takes under an hour, and a quick “before” photo helps you see how far you’ve come.
- Entryway: Mount a hook rail for coats and bags and set a shoe tray beneath it, then snap a photo of the clear floor.
- Kitchen: Clear everything off the counters except daily essentials and group pantry items by type, such as baking, snacks, and canned goods.
- Living room: Add a storage ottoman to hide throws, remotes, and magazines so the surfaces stay open.
- Bedroom: Adopt a one-in, one-out closet rule so new clothes never outnumber what’s already hanging.
- Bathroom: Use drawer dividers to separate daily items from extras, and toss anything expired while you’re at it.
- Garage or storage areas: Put up wall hooks for tools and bikes, and move loose items into clear bins you can see through.
The kitchen deserves a little extra attention because it works hardest. If you’ve ever wondered why some kitchens feel effortless to cook in, it often comes down to professional kitchen design principles like keeping the things you grab most within arm’s reach. You don’t need a remodel to borrow that idea. Just move your everyday items to the easiest spots and push the rarely used gadgets to higher shelves.
For a nice visual, try a side-by-side photo of your entryway before and after, or a labeled pantry shelf with neat rows of matching jars. Seeing the difference makes it much easier to stay motivated for the next room.
If you only have a few minutes, pick one item from the list and finish it today. Small wins stack up quickly, and each tidy space makes the next one feel easier to tackle.
Check Your Work and Keep the Clutter From Coming Back
Once you’ve finished sorting, give the room a quick walk-through test. Stand in the doorway and ask yourself one question: could everything be put away in under a minute? If the answer is yes, every item has a real home and your system is working. If you find yourself hunting for a spot, that’s a sign to adjust your storage rather than blame yourself.
Next, confirm that your donate and toss piles have actually left the house. Bags sitting in the hallway have a sneaky way of drifting back into your rooms. Load the car, schedule the pickup, and drop things off within a day or two while you still feel motivated.
Now let’s keep the clutter from creeping back. Three small routines do most of the work:
– Ten-minute daily reset: Set a timer and return stray items to their homes. Think mugs, mail, shoes, and throw blankets.
– Weekly surface check: Once a week, scan counters, tables, and nightstands for anything that doesn’t belong there.
– Seasonal review: Four times a year, revisit one closet, cabinet, or shelf and ask whether it still serves you.
Pairing your seasonal review with a project can make it feel less like a chore. If the kitchen is your trouble spot, sketching out a 3D kitchen design can show you where extra cabinets or a pantry shelf would solve a recurring pile-up before you buy a single bin.
Don’t forget that you’re not doing this alone. Share your routines and progress photos in the Gage Furniture community. Seeing someone else’s tidy entryway or labeled pantry can spark just the idea you needed. And if you’re stuck on a tricky storage problem, such as an awkward corner or a closet that never seems big enough, the experts in our community are happy to weigh in with practical suggestions.
Decluttering and Organizing Questions, Answered
Still have questions? You’re in good company. These come up again and again, and our community members have weighed in with their own tips along the way.
How long does it take to declutter a house?
It depends on the size of your home and how much stuff you’ve collected, but most people see real progress by working in short, focused sessions of 15 to 60 minutes. Tackling one drawer, shelf, or zone at a time usually beats trying to clear everything in a single marathon weekend.
Where should I start if I feel overwhelmed?
Pick one small, low-emotion spot like a junk drawer, bathroom cabinet, or linen closet. A quick win builds momentum, and you’ll have a clear before-and-after to feel good about.
What should I do with items I can’t decide on?
Put them in a “maybe” box, tape it shut, and note a date a few months out. If you haven’t reached for anything inside by then, you’ve got your answer, and it’s much easier to let go.
Is it better to declutter first or buy storage first?
Declutter first, every time. Once you know what you’re actually keeping, you can choose bins, dividers, or furniture with built-in storage that fit your real needs instead of guessing.
Another one we hear often is how to handle family members who’d rather not join in. Many community members find it works best to focus on your own spaces first, keep shared areas simple, and let tidy rooms do the persuading. Some have even shared how a single organized entryway got the whole household on board.
Got your own question or a trick that’s worked for you? Drop it in the comments. Someone in the Gage Furniture community has probably been exactly where you are, and your answer might be just what the next reader needs.
Decluttering your home doesn’t require a free weekend, a dumpster, or a total makeover. It’s a series of small, doable choices: one drawer, one shelf, one zone at a time. Each little win gives you a clearer counter, an easier morning, and the momentum to keep going.
So don’t wait for the “perfect” moment. Pick one spot today, set a timer for fifteen minutes, and sort what’s in front of you into keep, donate, toss, and relocate. Give every keeper a permanent home, snap a quick before-and-after photo, and give yourself credit. That’s real progress, and it adds up faster than you’d expect.
You also don’t have to do this alone. Join the Gage Furniture community to share your photos, ask questions about tricky storage problems, and swap ideas with other homeowners and specialists. We’d love to hear where you’re starting. What’s the first spot you’re tackling?